
Contents
Summary
Teeth whitening gel can be brushed onto teeth or applied to whitening trays that hold the gel in place. It can be a bit messy, but it is the most effective method in terms of results.
Description
One way to apply the gel is with a small brush, similar in size to the applicators in liquid correction formulas. A few minutes after application (depending on the product instructions), the gel will solidify and the active ingredients will start whitening. The active ingredient in paint-on whitening gels is up to 18% carbamide peroxide.
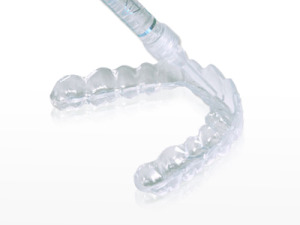 Another method of application for teeth whitening gels is using a mouth tray. These trays may be included with the whitening kit, or custom-made by a dentist. The gel is applied into the tray which is then worn for a certain amount of time. The gel intended to be used with whitening trays can contain as much as 44% carbamide peroxide. The equivalent potency with a hydrogen peroxide agent would be at a concentration of 15% because it is 3 times more effective.
Results
Whitening gels can whiten teeth up to 6 shades on average. There is no actual limit to how white you can brighten your teeth with this method. As long as you repeat the treatment, the shade will keep improving. The results will vary depending on the concentration used, how long the gel is in contact with the tooth surface, and how many times the treatment is repeated. Some gels can provide results in as little as one hour to as long as three weeks for full effect. Combining the gel with the tray is one of the most effective teeth whitening methods because the gel reaches every side of the teeth, basically bathing them in the whitening agent.
Pros and Cons
The overall advantage of gels, besides being very effective, is that they are very versatile. They offer various modes of application, different concentrations of bleaching agents, and they may contain anti-sensitivity ingredients if needed. So, according to the time available for each treatment, the delay required for full results, and the sensitivity of the person, a specific whitening gel can be chosen.
 Many people like the simplicity of the paint-on whiteners because they’re less messy than gels and trays. Their disadvantages include that the gel may dissolve too quickly to have optimal effect due to movement of the tongue and mouth while speaking after the gel’s been applied. Also, it can be more difficult for users to apply the gel to back teeth or those that are not directly in the smile line.
The advantage of the trays is that it helps keep the gel on the teeth longer and prevents the gel from becoming diluted with saliva. This means that whitening ingredients stay in contact with the enamel to produce results faster and more effectively than paint-on formulas. The trays also make it easier for the gel to cover all the teeth, and reach in between and behind teeth, which whitening strips and paint-on gels can’t do.
However, some people find that the one-size-fits-all trays included with many do-it-yourself whitening kits don’t remain in place properly. This can allow gel to leak out of the tray and touch sensitive gums. As an alternative, whitening trays can be made by a dentist so that they fit perfectly.
Tips and Guidelines for Use
To get the best results from your whitening gel, follow these tips:
- Minimize talking and other activities. Avoid too much talking, as well as drinking and eating while the whitening agent is doing its job. This will avoid dislodging or wiping away the gel.
- Dry your teeth. Use a blow dryer on your teeth for about 30 seconds or wipe them dry with a washcloth. This will help the gel adhere better to your teeth.
- Brush your teeth before. Brush and floss your teeth to make sure there are no food particles or plaque on your teeth. Use a non-fluoride toothpaste, however, since fluoride will actually inhibit the whitening process.